Table of Contents
If you have multiple contact forms or newsletter sign-up forms on your website, it’s essential to know exactly which page your visitors used to submit their information. This information can help you optimize your site and improve your user experience. In this easy-to-follow guide, we’ll show you how to determine the specific page where a contact form was filled out using Elementor Form. We’ve explained each step in simple language.
Identify Submission Pages with Elementor
Step 1: Access Your Elementor Form
To get started, navigate to the Elementor form on your website that you want to track.
Step 2: Edit the Form
Once you’re on the form, click the “Edit Form” button to access the form’s settings.
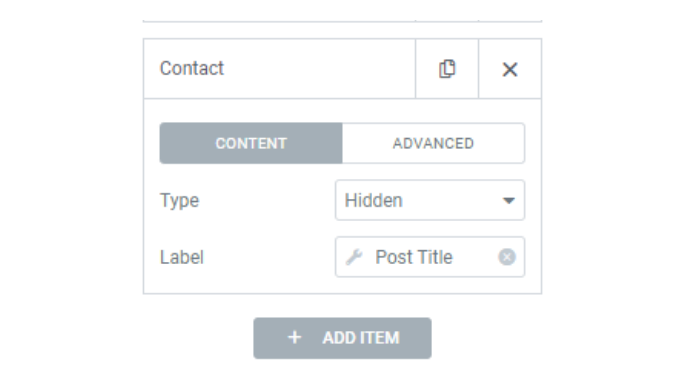
Step 3: Add a Hidden Item
Now, you need to add a new item to your form. Click on the “Add Item” button and choose the item type as “Hidden.” This means that the field will not be visible to your site visitors, but it will store the information you need.
Step 4: Label the Hidden Item
After choosing the hidden item type, label it as “Post Title.” This will allow you to track the title of the page where the form was submitted.
Step 5: Update Your Page
Finally, don’t forget to click “Update” to save the changes to your form.
Title: Elementor Form Post Title vs. Page Title: Understanding the Difference
Elementor is a powerful page builder for WordPress, allowing users to create visually stunning pages with ease. One of its many features is the Elementor Form widget, which makes it simple to add contact forms, newsletter sign-ups, and more to your website. In this blog post, we will discuss the difference between the Post Title and Page Title in the context of Elementor Forms and how each can be used effectively.
Post Title in Elementor Forms
The Post Title in Elementor Forms refers to the title of the post or page on which the form is embedded. When you add a hidden field to your form and set its label as “Post Title,” Elementor will automatically populate the field with the title of the post or page where the form is located. This information can be helpful when you receive form submissions, as it allows you to know exactly which post or page the form was submitted from.
To add the Post Title hidden field to your Elementor Form, follow these steps:
- Open the Elementor editor for the page where your form is located.
- Click on the Form widget to edit it.
- Add a new item to the form and set its type as “Hidden.”
- Set the label of the hidden field as “Post Title.”
- Update your page.
Now, when you receive a form submission, you will know from which post or page the form was filled out and sent.
Page Title in Elementor Forms
The Page Title, on the other hand, refers to the title of the specific page template being used for the post or page. This might be different from the Post Title if you’re using a custom page template or if the form is embedded on multiple pages with different titles. In some cases, the Page Title can provide additional context to help you understand the source of the form submission better.
To add the Page Title hidden field to your Elementor Form, follow these steps:
- Open the Elementor editor for the page where your form is located.
- Click on the Form widget to edit it.
- Add a new item to the form and set its type as “Hidden.”
- Set the label of the hidden field as “Page Title.”
- Update your page.
Now, when you receive a form submission, you will know from which page template the form was filled out and sent.
Conclusion: Enjoy Tracking Your Form Submissions
That’s it! From now on, you’ll know precisely which page your contact form was filled out and sent from. This valuable information can help you understand which pages are generating more interest and user engagement, allowing you to fine-tune your website’s content and layout for maximum impact. Happy tracking!
BONUS #1
You can read the related blog titled “How to Create an Elementor Form for Your Website” for more information.
BONUS #2
You can read the related blog titled “How to Keep Your Elementor Form Safe from Spam” for more information.